
TL;DR:
App localization involves adapting app content to suit specific linguistic and cultural needs, with proper internationalization laying the foundation. Start localizing by choosing the most relevant language based on user data, and externalize all text in resource files to support scalable, timely updates.
App localization is the process of adapting your application’s content, interface, and functionality to meet the linguistic and cultural expectations of a specific market. The industry standard term is localization (l10n), and it sits one step beyond translation. When you localize app experiences properly, users in Tokyo, Berlin, or São Paulo feel like your product was built for them. This guide covers every stage of that process, from choosing your first target language to shipping a tested, production-ready build, using 2026 best practices throughout.
What does it mean to localize an app?
Internationalization (i18n) and localization (l10n) are two distinct phases. Internationalization is the technical work of designing your app to support multiple languages. Localization is the act of adapting it for each specific locale. You cannot skip i18n and expect l10n to go smoothly. Think of i18n as laying the foundation and l10n as building the rooms.
The practical difference matters for your team’s planning. Developers own i18n: they set up resource files, configure locale detection, and build flexible layouts. Product managers and UX writers own l10n: they manage translation workflows, review linguistic quality, and sign off on cultural fit. Both roles need to be aligned before a single string gets translated.
Tools like iOS String Catalogs and Android resource XML files are the standard formats for externalizing UI text on mobile platforms. On the web, JSON and XLIFF are the dominant formats. Choosing the right format early prevents painful migration work later.
How to choose which languages to localize first
The biggest mistake product teams make is launching five languages at once. Start with one foreign language to build a repeatable workflow before scaling. One language forces you to solve the hard problems: string extraction, translator handoff, QA, and release integration. Solving them once makes every subsequent language faster.
Your language selection should be data-driven. Pull from three sources:
App analytics: Which countries generate your highest organic installs or trial signups?
Revenue data: Which markets convert at rates that justify localization investment?
Competitive analysis: Where are your direct competitors already localized? That signals proven demand.
Technical readiness: Does your target language require right-to-left (RTL) support or a non-Latin character set? Those require extra engineering work.
Balancing these factors prevents you from chasing a large market your app is not technically ready to serve. A product team that ships broken Arabic RTL layouts does more damage to brand trust than no Arabic support at all.
Pro Tip: Use your existing user base first. If 15% of your current users set their device language to French but your app is English-only, French is your lowest-risk first localization target.
Localization strategies for apps that scale well share one trait: they treat language selection as a product decision, not a translation task. Assign it the same rigor you give feature prioritization.
How should you prepare your app’s architecture for localization?
Solid architecture is what separates a localization project that ships on time from one that causes a two-week release delay. The core principle is simple: store all user-facing text in resource files, never hardcoded in your source code. JSON, XML, and platform-native Strings files all work. The format matters less than the discipline of keeping code and content completely separate.
Key architecture requirements
Externalize every string. Buttons, error messages, tooltips, push notifications, and onboarding copy all belong in resource files. Hardcoded strings are the single most common cause of untranslatable content.
Use specific locale codes. Use en_US instead of en to correctly handle date formats, currency symbols, and number separators. Generic locale codes produce subtle formatting errors that erode user trust.
Design for text expansion. Build layouts with a 20–30% text buffer to absorb expansion without breaking your UI. This is standard practice as of 2026.
Use dynamic sizing. Never use fixed-width UI elements. On Android, use
wrap_content. On iOS, use intrinsic content size. Both adapt automatically to text length and system font scaling.Support RTL from day one. Arabic and Hebrew require mirrored layouts. Adding RTL support after launch is expensive. Build it into your base layout system early.
The text expansion point deserves emphasis. German, Finnish, and Russian text can run up to 30% longer than English. A button that reads “Save” in English becomes “Speichern” in German. If your button has a fixed width, that label gets clipped. Multiply that across hundreds of UI elements and you have a broken product.
Language | Typical text expansion vs. English | Layout risk |
|---|---|---|
German | Up to 30% longer | High |
Russian | Up to 30% longer | High |
Finnish | Up to 30% longer | High |
French | 15–20% longer | Medium |
Japanese | Often shorter | Low |

Pro Tip: Run a pseudo-localization pass before you send strings to translators. Replace all characters with accented equivalents and pad strings to 130% of their original length. Any UI breaks you find now cost nothing to fix. The same breaks found after translation cost time and money.
What is the step-by-step workflow for executing app localization?
A clean execution workflow prevents the two most common failures: untranslated strings shipping to production and translated strings breaking the build. Integrating CI/CD pipelines that automate string extraction and testing catches both problems before they reach users.
Extract strings. Export all localizable strings from your resource files into a translation-ready format. XLIFF is the most portable option and is supported by most professional translation tools and platforms.
Choose your translation approach. Professional human translators produce the highest quality for marketing copy and onboarding flows. AI-assisted translation with human review works well for UI strings and error messages. Pure machine translation is acceptable only for internal or low-visibility content.
Manage the translation handoff. Give translators context. Screenshots, character limits, and glossaries reduce back-and-forth and improve first-pass quality. A translator who knows a string appears on a 44px button will not write a 12-word label.
Integrate translated files. Import completed translations back into your resource file structure. Automate this step with your CI pipeline to eliminate manual copy-paste errors.
Localize your App Store metadata. App name, description, and keywords must be localized per locale for better local search visibility. This step directly affects discoverability and download volume. Skipping it leaves organic growth on the table.
Deploy OTA fixes. Over-the-Air SDK updates let you push translation corrections without waiting for App Store review. This is critical for fixing post-launch linguistic errors quickly.
For teams building scalable localization workflows, the difference between a one-time project and a repeatable system is automation at steps 1 and 4. Manual string management breaks down the moment you add a second language.
Approach | Speed | Quality | Best for |
|---|---|---|---|
Human translation only | Slow | Highest | Marketing copy, legal text |
AI + human review | Fast | High | UI strings, onboarding |
Machine translation only | Fastest | Variable | Internal tools, low-visibility text |
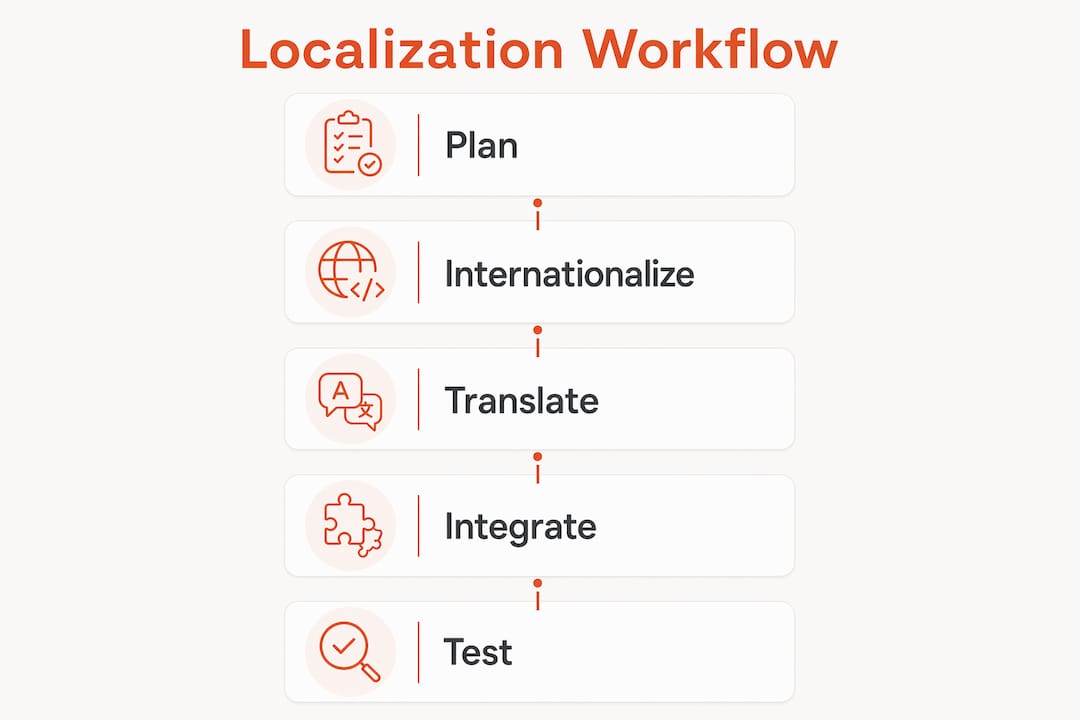
How to test and QA your localized app
Linguistic review and functional testing are both required. Passing one without the other ships broken products. Testing must cover plural forms, date and time formatting, RTL support, and string display across every target locale. Each of these can fail independently.
Run your QA process against this checklist:
Plural forms: English has two (singular, plural). Russian has six. Arabic has six. If your app uses a single plural form for all languages, it will display grammatically wrong strings in most Slavic and Semitic languages.
Date and time formats: The US uses MM/DD/YYYY. Germany uses DD.MM.YYYY. Japan uses YYYY/MM/DD. Hardcoded date formats break trust immediately.
Currency and number formats: The US uses a period as a decimal separator. Germany uses a comma. Displaying “$1.000” to a German user reads as one dollar, not one thousand.
Fallback locales: Define what your app displays when a translation is missing. A blank label or a raw string key is worse than an English fallback.
Font rendering: Test on real devices, not just emulators. CJK (Chinese, Japanese, Korean) characters and Arabic script render differently across operating systems and device manufacturers.
The most expensive localization bugs are the ones users find. Test on real devices in each target locale before every release, not just at launch.
Pro Tip: Assign a native speaker to do a 30-minute walkthrough of your app in each new locale before you ship. Automated tests catch technical failures. Native speakers catch the cultural ones.
Key takeaways
Successful app localization requires technical preparation, strategic language selection, and disciplined QA at every stage of the process.
Point | Details |
|---|---|
Internationalize before you localize | Build flexible architecture with externalized strings before translating a single word. |
Start with one language | Launch one locale first to build a repeatable, scalable workflow before expanding. |
Design for text expansion | Add a 20–30% buffer to all UI layouts to prevent German, Russian, and Finnish from breaking your interface. |
Automate string extraction | Use CI/CD pipelines to eliminate untranslated strings reaching production builds. |
Test with native speakers | Automated QA catches technical failures; native speaker review catches cultural and linguistic ones. |
Why I think most teams localize apps in the wrong order
Most product teams treat localization as a post-development task. They build the entire app in English, freeze the design, and then hand it to a translator. That sequence guarantees pain. Layouts break. Strings get hardcoded in the rush to ship. The translator has no context. The result is a localized product that feels translated, not native.
The teams I have seen do this well treat localization as part of the product build, not a phase after it. They externalize strings from sprint one. They design with text expansion in mind from the first wireframe. They run pseudo-localization before the first translator is ever hired. By the time they actually localize, the hard work is already done.
The other lesson I keep coming back to is the value of automation. Balancing automation with human linguistic quality is the real skill. Automation handles the mechanical work: extraction, integration, testing for missing strings. Humans handle the judgment calls: tone, cultural fit, brand voice. Teams that try to automate the judgment calls end up with technically correct but culturally flat products. Teams that skip automation end up with manual processes that collapse under the weight of a second or third language.
Start small. Automate the mechanics. Invest human attention where it actually matters.
— Antoine
Take your app localization further with Gleef
Localization breaks down when design and translation live in separate tools. Gleef fixes that by bringing AI-powered translation directly into Figma, so your product team manages strings in context without switching platforms.
Gleef’s semantic translation memory, glossaries, and in-context editing mean your translations stay consistent with your brand voice across every locale and every release. Teams using Gleef report faster release cycles and fewer translation-related blockers. If you want to see how it fits your workflow, the Gleef Figma Plugin is the fastest way to get started. You can also explore Gleef’s full guide on optimizing your localization workflow for a deeper look at 2026 best practices.
FAQ
What is the difference between i18n and l10n?
Internationalization (i18n) is the technical process of designing your app to support multiple languages. Localization (l10n) is adapting it for a specific locale, including language, formats, and cultural conventions.
How many languages should I launch with?
Start with one foreign language. Building a repeatable workflow with a single locale prevents the compounding errors that come from managing multiple translation pipelines simultaneously.
Why do German and Russian break app layouts?
German, Finnish, and Russian text can run up to 30% longer than equivalent English strings. Fixed-width UI elements clip these labels. Use dynamic sizing like wrap_content on Android and intrinsic content size on iOS to prevent this.
Do I need to localize my App Store listing?
Yes. App name, description, and keywords must be localized per locale to improve local search visibility and drive organic downloads in each target market.
What is an OTA SDK update in localization?
An over-the-air (OTA) SDK update lets you push translation fixes to users without waiting for App Store review approval. It is the fastest way to correct post-launch linguistic errors.